Fluffy Whole Wheat Pita Bread
Wondering how to bake soft whole wheat pita bread at home? Let me share my grandmother's beloved recipe that fills your kitchen with warmth and flavor!

- Bake Soft Whole Wheat Pita Bread at Home: A Journey into Flavor
- A Little History Goes a Long Way
- Why You’ll Love This Recipe
- Getting Started
- Your Essential Ingredients Guide to Baking Pita Bread
- Mastering the Art of Baking Soft Whole Wheat Pita Bread at Home
- Pro Tips & Secrets for Baking Pita Bread
- Perfect Presentation
- Storage & Make-Ahead
- Creative Variations
- Complete Nutrition Guide
- Expert FAQ Solutions
- Don’t Forget the Fun!
- Recipe Card
Bake Soft Whole Wheat Pita Bread at Home: A Journey into Flavor
Oh my gosh, have you ever bitten into a warm, fluffy pita bread straight out of the oven? it’s like a warm hug.
I remember the first time i tried to bake soft whole wheat pita bread at home . i may have botched it a couple of times (okay, maybe more than a couple!).
But let me tell you, there’s nothing quite like that moment when the dough puffs up beautifully. the smell fills the kitchen, and you just know something incredible is about to happen.
Nothing connects us like food, right? especially when it’s homemade and fresh. whether you’re having a cozy dinner or throwing a mediterranean-themed party, fluffy pita can truly elevate your meal.
And it’s so versatile! you can wrap sandwiches in it, dip it in your favorite sauces, or just eat it plain because it’s that good.
A Little History Goes a Long Way
Did you know that pita bread traces its roots back thousands of years to the middle east? it’s been the staple for many cultures, embodying that perfect balance of simplicity and flavor.
Fast forward to today, and this beloved bread hasn’t lost its charm. it makes an appearance at barbecues, brunches, and even casual weeknight dinners.
Who can resist the allure of homemade pita ?
From preparation to baking, making this bread is easier than you think! it usually takes about 1 hour 35 minutes , with only 20 minutes of active prep .
So, you can whip it up while binge-watching your favorite show. plus, it yields 8 satisfying pitas , which is perfect for a small gathering or a week’s worth of delicious lunches.
And let’s talk cost: this is a budget-friendly recipe that doesn’t skimp on taste!
Why You’ll Love This Recipe
You might ask, “what’s so special about homemade pita bread?” well, let me break it down. first, there are some pretty serious nutritional benefits of whole wheat bread .
Whole wheat flour is packed with fiber. so, you get that satisfying fullness without the extra calories. that’s a win in my book!
Second, the fluffy texture you get from making it at home is unmatched. those store-bought versions? they don’t even come close.
You can achieve a perfect puff pita that is soft and tender inside, with a bit of a crust that’s just right.
It’s a game changer for your meal!
Planning for special occasions? this bread is a great way to wow your guests. it pairs beautifully with homemade dips for pita bread like tzatziki and hummus.
Or even better, how about using it to wrap some grilled veggies and meats? the possibilities are endless!
Getting Started
Ready to dive in? you’re gonna need some essentials: whole wheat flour, active dry yeast, olive oil, warm water, and a pinch of salt.
Seriously, making pita bread isn’t rocket science. it’s all about patience. it’s just a matter of mixing the ingredients, letting that dough rise, and popping it in a hot oven.
Here’s a little tip from my own journey: don’t skip the dough rising tips! letting the dough rest in a warm place is like giving it a little vacation.
It’s gonna fluff up beautifully, and you’ll have homemade pita with herbs or any other variation you dream up.
I can’t wait for you to try this recipe and infuse your kitchen with that wonderful warmth of fresh bread! Let’s head on over to the ingredients list and get this party started!
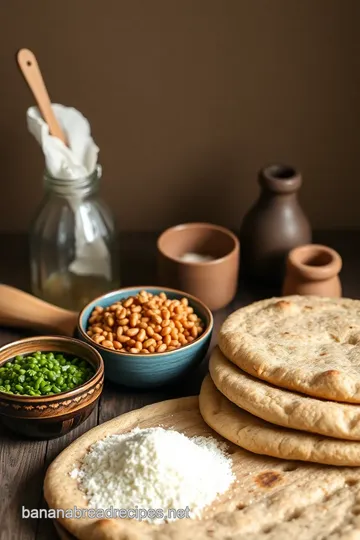
Your Essential Ingredients Guide to Baking Pita Bread
So, you’re ready to bake some fluffy whole wheat pita bread at home? awesome choice! nothing says “homemade goodness” quite like freshly baked pita.
It’s like a warm hug from the mediterranean. let’s dive into the essentials you need to make this easy pita bread recipe a delicious reality.
Premium Core Components
First off, let’s chat about your core ingredients :
-
Whole wheat flour : aim for 3 cups (360g) . look for flour with a nice nutty smell. it should feel soft but not overly powdery.
Whole wheat flour brings in great nutritional benefits —think fiber and energy!
-
Warm water : about 1 cup (240ml) . it needs to be around 110° f ( 43° c) . use a kitchen thermometer if you’ve got one; if not, feel the warmth with your fingers.
It should feel like a warm bath, not boiling lava!
-
Yeast : Grab a packet of active dry yeast (2¼ teaspoons or 7g) . It’s your magic worker! Look for a fresh packet—expired yeast leads to sad, flat pita.
-
Honey or Sugar : Use 2 tablespoons (30ml) . A little sweetness helps activate the yeast.
-
Olive Oil : 2 tablespoons (30ml) will do. Look for high-quality extra virgin; it adds flavor and tenderness. Plus, who doesn’t love a drizzle of olive oil in bread recipes?
-
Salt : You’ll need 1 teaspoon (5g) for flavor balance. Don’t skip this! Salt makes everything better.
Signature Seasoning Blend
Now, for the flavor, let’s dig into some spicy goodness ! while the pita itself is pretty neutral, you can definitely amp it up with some herbs.
How about a sprinkle of dried oregano or thyme? these make delightful variations, giving your pitas a mediterranean vibe.
You could even infuse the dough with garlic powder or a pinch of cumin for some extra warmth. These herbs pair perfectly, adding complexity to your homemade pita bread.
Smart Substitutions
Got dietary restrictions? Or maybe you just ran out of something? No worries! Here’s where the smart substitutions come in handy:
-
Whole Wheat Flour Alternatives : If you’re going gluten-free, try chickpea flour or a gluten-free blend. Just note they may require a different water ratio.
-
Sweeteners : Maple syrup or agave nectar works well in place of honey if you want a vegan pita bread recipe.
-
Olive Oil : Use coconut oil or any neutral oil; it’s a solid switch-up without losing that rich texture.
Kitchen Equipment Essentials
Before you start, make sure you’ve got the right tools. Here’s your kitchen must-haves :
- Mixing Bowl : A big one, please! You’ll be working that dough.
- Rolling Pin : This baby helps shape your pitas to that perfect, even thickness.
- Baking Sheet or Pizza Stone : Perfect for that crisp base. Ideally, preheat these with your oven!
- Towel : A clean one to cover your dough while it’s rising. A little warmth goes a long way.
Time to Bake!
Now, with all your ingredients and tools in place, you’re ready to bake some heavenly fluffy pita bread . follow my step-by-step pita bread instructions; it’s simple and super rewarding.
Make sure you give the dough enough time to rise— it’s that patience thing again . you’ll want those pockets to form!
And remember: storing homemade pita bread properly is also crucial. keep them wrapped in a towel or in a sealed container to preserve that fresh taste.
Crisping pita bread tips? maybe a quick toast in the oven will do the trick.
So, whether you’re wrapping sandwiches in pita, dipping them in hummus, or having them with warm, spiced dishes, this homemade pita bread will bring joy to every meal.
Let’s get baking and create some beautiful mediterranean bread recipes that will impress family and friends alike! ready? let’s jump into the instructions and watch those pitas puff up beautifully!
Mastering the Art of Baking Soft Whole Wheat Pita Bread at Home
Baking can be a super fun adventure, especially when you’re diving into whole wheat recipes like this fluffy pita bread .
You know that feeling when you're craving something homemade and warm? well, this recipe is just what you need! let’s break it down, shall we?
Essential Preparation Steps
First things first, we gotta get organized! this is where mise en place becomes your best friend. it just means “everything in its place.
” gather your ingredients: 3 cups of whole wheat flour, 1 cup of warm water (about 110° f), olive oil, honey, salt, and yeast .
Pre-measuring makes the whole process smoother.
Now, let’s talk time management . you’ll want to give that dough about 1 hour to rise , and that’s the perfect time to clean up your workspace.
Trust me, a tidy kitchen makes for a happy baking experience.
Organization is key. lay everything out: mixing bowls, a whisk (or a wooden spoon if you roll that way), and your rolling pin.
This will save you from scrambling around mid-bake. don't forget about safety, too. make sure your oven is up to the task and that you don’t burn yourself on that hot baking sheet later on!
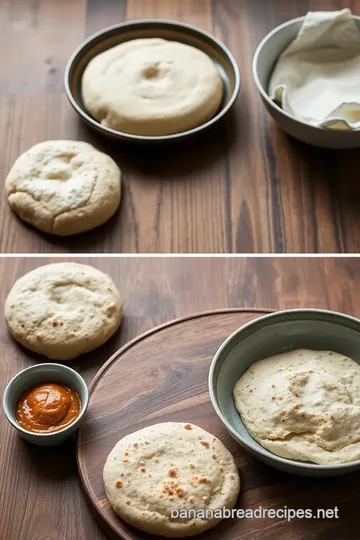
Step-by-Step Process
Now for the fun part—the step-by-step directions !
-
Activate the yeast : in your mixing bowl, stir together the warm water , honey , and yeast . let it sit for about 5- 10 minutes until it’s frothy.
If it’s not bubbling, toss it and start again. ain’t nobody got time for flat pita!
-
Mix the dough : Add in the whole wheat flour , salt , and olive oil . Stir until a dough forms.
-
Knead the dough : Turn it out onto a floured surface and knead for about 8- 10 minutes until it’s silky smooth.
-
First rise : Place it in an oiled bowl, cover it with a towel, and let it rise for about an hour until it’s doubled up.
-
Preheat the oven : Crank it up to 475° F . Hot ovens make for that perfect puff !
-
Shape the pitas : After punching down your dough, divide it into 8 sections . Roll each into a ball and then flatten to about ¼ inch thick .
-
Bake : Pop those discs onto your hot baking sheet and bake for 10- 15 minutes . You’ll know they’re done when they puff up and turn golden.
-
Cool : Take them out and cover them with a towel to keep them warm and soft.
Expert Techniques
Here’s a little pro tip: make sure your oven is truly preheated! A hot oven is the secret to those airy, fluffy pitas we all love.
Check for doneness visually; that lovely puff should be obvious. if your pitas don’t puff up perfectly on your first try, don’t sweat it! it’s all about those techniques.
Sometimes a little kneading and dough management makes a world of difference.
Success Strategies
Now, onto common mistakes to avoid. If your pitas are flat, it could be the yeast wasn’t active or you didn’t roll them evenly.
Always keep an eye on that timing and temperature . If you’re always checking the oven, your temperature inside can drop, leading to sad little pitas.
And if you’re after make-ahead options , feel free to double the batch and freeze some for later. they freeze beautifully! just pop them in the oven to crisp them up when you’re ready to enjoy.
Conclusion
So there you have it! this is how to bake soft whole wheat pita bread at home . it’s straightforward and even newbies can find joy in crafting their own homemade pita bread.
Pair them with rich dips or wrap your favorite sandwiches; the options are endless!
Next up, join me in the Additional Information section, where you can discover various ways to elevate your pita game even more and keep this delightful journey rolling in your kitchen!
Pro Tips & Secrets for Baking Pita Bread
When it comes to learning how to make pita bread, i’m all about keeping it straightforward and fun! here are some pro tips that i've picked up along the way to help you bake soft whole wheat pita bread at home like a pro.
Chef's Personal Insights
First off, don’t rush the yeast! give it the time it needs to activate. if your yeast doesn’t get all frothy and bubbly, your dough will just sit there like a brick, and no one wants that.
Trust me, i've learned this the hard way. also, if you can, use a kitchen scale for measuring flour. it can really make a difference in getting that perfect fluffy pita.
Time-Saving Techniques
Want to cut prep time? consider making double the dough. you can freeze half and have fresh travel-ready pitas whenever you need them—think quick lunches or picnics.
Just wrap in foil or freezer bags, and they’re good to go.
Flavor Enhancement Tips
For some serious flavor, try adding spices. a sprinkle of cumin or smoked paprika to the dough gives it a savory twist that’s just divine.
Ever tried garlic powder in your pita? game changer!
Presentation Advice
Now, let’s talk about the way you present those bad boys once they’re baked. stack them nicely on a plate, and maybe drizzle a bit of olive oil on top.
A sprig of parsley or a dash of paprika also amps up the visual appeal. remember, we eat with our eyes first!
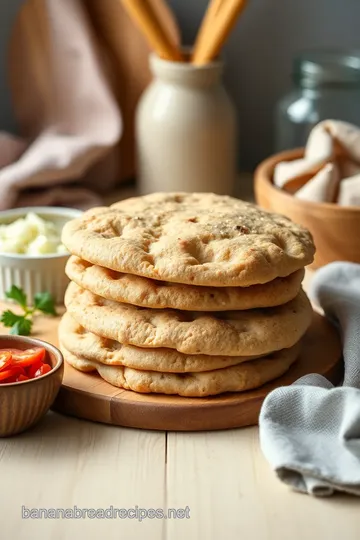
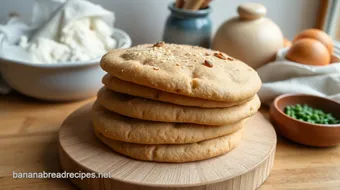
Perfect Presentation
When serving your homemade pita bread, think about the plating techniques. a simple stack with a colorful garnish can go a long way.
Vibrant colors catch the eye and make your meal look more appetizing. pair pitas with some bright carrots stuffed with your favorite dip on the side—not only looks gourmet but delicious too!
Garnish Ideas
Try garnishing with fresh herbs or a sprinkle of sesame seeds. these not only add a pop of flavor but elevate the whole dish visually.
You can even serve them in small baskets lined with parchment paper for that extra touch of style that’s super inviting.
Storage & Make-Ahead
If you whip up a batch of these whole wheat recipes, you may be wondering about storage. well, homemade pita bread is best enjoyed fresh, but you can keep them in an airtight container at room temperature for one to two days.
To freeze, layer them with parchment paper in a freezer bag—this keeps them from sticking together.
Reheating Instructions
When you're ready to dig in, just pop your pitas in a warm oven for about 10 minutes to get that soft texture back.
You can also use a skillet to warm them quickly for that fresh-baked taste.
Creative Variations
Feeling adventurous? mix it up! you can easily adapt the flavors by using different spices or herbs in the dough.
Want a vegan pita bread recipe ? just skip the honey and use maple syrup instead!
Seasonal Twists
In the fall, why not add pumpkin puree for a fun Thanksgiving twist? Or in summer, some finely chopped fresh herbs like basil or dill can be killer.
Regional Variations
Explore different Middle Eastern bread recipes —like adding za’atar for a Middle Eastern twist that’s fantastic with olive oil. The world is your oyster when it comes to pita variations!
Complete Nutrition Guide
Next, let's touch on the nutritional benefits of whole wheat bread. whole wheat flour is packed with fiber and nutrients.
Just try to remember that these homemade pitas are healthier than store-bought choices, thanks to less processing and real ingredients.
Portion Guidance
Serving size is key! generally, a serving is one pita . with about 160 calories and 4 grams of fiber , they’re a great option for lunch or a light dinner.
Use them for wrapping sandwiches, and you’ve got a healthy snack idea ready to go!
Expert FAQ Solutions
Got questions? i’ve got answers. if your pitas don’t puff up, it might be because your dough is either too thick or the oven’s not hot enough.
Make sure your oven is preheated for at least 30 minutes before baking!
Troubleshooting Guide
If you find your dough isn't rising properly, try moving it to a warmer location. Sometimes, using a damp towel over the bowl can help keep the heat in.
Success Tips
When all else fails, remember it’s about enjoying the process. Baking is all about trial and error. Each batch teaches you something new, so don’t stress it!
Don’t Forget the Fun!
Baking fluffy pita bread is so rewarding! whether you're scooping up hummus or stuffing them with lovely grilled veggies, there’s a uniquely rewarding experience baked into every bit.
So grab your ingredients, whip up that dough and let the sizzle and aroma fill your kitchen. you’ll be one step closer to mastering your favorite mediterranean diet recipes .
Happy baking!
Fluffy Whole Wheat Pita Bread Card
⚖️ Ingredients:
- 3 cups (360g) whole wheat flour
- 1 cup (240ml) warm water (110°F or 43°C)
- 2 tablespoons (30ml) olive oil
- 2 teaspoons (10g) honey or sugar
- 1 teaspoon (5g) salt
- 1 packet (2 ¼ teaspoons or 7g) active dry yeast
🥄 Instructions:
- Step 1: Combine warm water, honey, and yeast in a mixing bowl. Allow to sit for 5-10 minutes until frothy.
- Step 2: Add whole wheat flour, salt, and olive oil to the yeast mixture. Stir until a dough forms.
- Step 3: Turn the dough onto a floured surface. Knead for about 8-10 minutes until smooth and elastic.
- Step 4: Place the dough in a lightly oiled bowl. Cover with a damp towel and let rise in a warm place for 1 hour, or until doubled in size.
- Step 5: Preheat your oven to 475°F (245°C) with a baking sheet or pizza stone inside.
- Step 6: Punch down the risen dough and divide it into 8 equal pieces. Roll each piece into a ball and then flatten into a disk about ¼ inch thick.
- Step 7: Carefully place the disks on the hot baking sheet or pizza stone. Bake for 10-15 minutes until pitas puff up and turn lightly golden.
- Step 8: Remove pitas from the oven and cover them with a kitchen towel while cooling.
Previous Recipe: How to Bake Cranberry Bread with Zesty Orange Glaze: An Easy Family Favorite
Next Recipe: How to Bake Gluten-Free Chocolate Cake - Fudgy Delight: 5 Simple Tips for Success!