Golden Garlic Frozen Breadsticks
Wondering how to make the best frozen breadsticks? Discover my buttery, garlic-infused recipe that's perfect for any meal or as a delightful snack!

- A Delicious Introduction to Golden Garlic Frozen Breadsticks
- The Story Behind Breadsticks
- Why You’ll Love These Breadsticks
- Time to Gather Ingredients!
- Essential Ingredients Guide: Your Go-To for Frozen Breadsticks Galore
- Mastering Professional Cooking Methods for Fluffy Breadsticks
- Save Time in the Kitchen: Tips for Golden Garlic Frozen Breadsticks
- Recipe Card
A Delicious Introduction to Golden Garlic Frozen Breadsticks
Oh my gosh, let me tell you about the first time i tried my hand at homemade garlic breadsticks! i was hosting a game night, and i wanted to impress my friends.
So, i decided to whip up some frozen breadsticks. i mean, what could go wrong, right? well, spoiler alert: everything went wrong at first! but after a little trial and error, i discovered the magic of making these fluffy beauties from scratch, and trust me, it was so worth it.
You see, these golden garlic frozen breadsticks are more than just a side dish. they’re a buttery love letter to your taste buds that can elevate any meal or stand alone as a delightful snack.
Seriously, if you’ve never made your own breadsticks, get ready to add "bread baker" to your resumé! let’s dive in and explore what makes this recipe so special.
The Story Behind Breadsticks
Breadsticks have a rich history, spanning back to ancient italy. at their roots, they were simple, rustic creations, meant to accompany meals.
These days, they’re a staple in many restaurants and homes. with the rise of food trends, the quest for quick snacks has made recipes for easy breadsticks from scratch all the rage.
People are looking for that homemade touch that just can’t be found in store-bought alternatives!
For this specific recipe, you’ll need about an hour and a half from start to finish, including the dough rising.
Yeah, it sounds like a bit of a commitment, but it’s honestly easier than it sounds! plus, you get to keep extras in your freezer for those nights when you just want something quick and delicious.
I’m telling you, these freezer-friendly meals are a game-changer!
And when it comes to costs, you probably have most ingredients already in your pantry. we're talking four cups of all-purpose flour, some yeast, and garlic.
It won’t break the bank and makes about 12 heavenly breadsticks.
Why You’ll Love These Breadsticks
Now, let's chat about the good stuff! these breadsticks aren't just fluffy piles of carbs; they come with some pretty sweet health benefits too.
Whole wheat flour and the nutritional benefits of breadsticks can provide fiber and essential nutrients!
What makes these doughy delights stand out is their restorative power. you can pair them with marinara sauce, serve them at a dinner party, or just snack on them while binge-watching your favorite show.
They’re perfect for any special occasion , like thanksgiving or an italian-themed date night! you might even find them making their way into family traditions.
What's unique here is that you can customize them! swapping in different herbs like rosemary or thyme or adding cheese creates entirely new flavors! trust me; your taste buds will be having a party.
And if you love garlic as much as i do, get ready for a flavor explosion with that classic garlic butter topping.
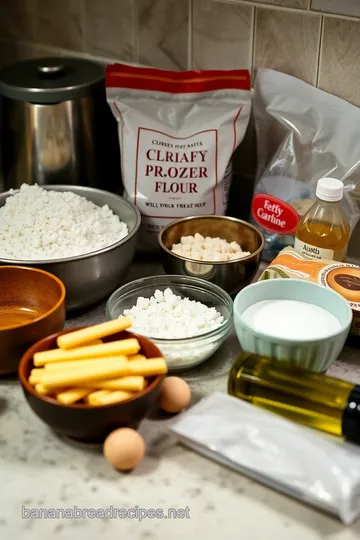
Time to Gather Ingredients!
Okay, so now that i’ve rambled on about how amazing these are, let’s chat ingredients! you’ll need a few simple items, but don't worry—i promise you can find them all at your local grocery store.
Just remember to think ahead and consider using air-tight freezer storage options so you can enjoy these treasures later!
Time to roll up your sleeves and make some golden garlic frozen breadsticks! they really are the heart and soul of any meal, and i can’t wait to share my recipe with you.
It’s time to get your kitchen rocking and rolling!
Essential Ingredients Guide: Your Go-To for Frozen Breadsticks Galore
Okay, friends, let’s dive into something that every home cook needs— the essential ingredients that’ll make your kitchen adventures not just successful, but super satisfying! whether you’re whipping up homemade garlic breadsticks or pulling frozen breadsticks from the freezer, knowing your ingredients is key.
Who knows? you might even discover a new favorite recipe along the way!
Premium Core Components
To kick things off, let’s chat about the core components of any good breadstick recipe.
- All-purpose flour : You’ll want about 4 cups (500 grams) for those fluffy breadsticks. It’s the backbone of your dough.
- Active dry yeast : Grab yourself a packet (that’s 2¼ teaspoons or 7 grams )—this is what makes your bread rise.
- Salt : Just 1 teaspoon will help to enhance the flavors. It’s a must!
- Sugar : Adding 1 tablespoon will help with the yeast activation. Sweet success, right?
- Warm water : About 1½ cups ( 110° F or 43° C, that’s 360 ml for you metric folks) is essential for activating that yeast.
- Olive oil : Use about 2 tablespoons (30 ml) for a bit of bite and richness.
What’s great here is that these ingredients have a pretty long shelf life. just keep them in air-tight storage , and you’ll be good for months.
Quick tip: for freshness, check the expiration dates, and remember to look for quality indicators when purchasing—like a nice bag for your flour and a good brand of yeast that’s not clumped together.
Signature Seasoning Blend
Now that we’ve got the base covered let’s jazz it up with some seasoning magic .
-
Garlic butter topping : seriously, nothing beats this. you’re going to need ½ cup melted butter, four cloves of finely minced garlic, and if you want to be fancy, add 1 teaspoon of dried parsley.
Nothing says "i love you" like garlic butter!
-
Herbs and spices : Think about using fresh herbs like rosemary and thyme . They complement breadsticks beautifully, especially when you’re making variations like cheesy garlic breadsticks .
Baking is all about the layers of flavor, and with the right seasonings, you’ll have a bowl of fluffy breadsticks that practically sing on your plate!
Smart Substitutions
So, you want to make these sticks but can't find an ingredient? No problem! Here are some common and smart substitutions :
- Flour alternatives : If you don’t have all-purpose flour, bread flour works like a charm. It gives a chewier texture.
- Olive oil : No olive oil? Use melted coconut oil or any other neutral oil in a pinch.
- Garlic powder : Out of fresh garlic? Just toss in 1 teaspoon of garlic powder—easy peasy.
Don’t shy away from improvisation. It’s all about what you have on hand. Your creativity can lead to unique flavored bread recipes.
Kitchen Equipment Essentials
Now, let’s not forget the tools of the trade! Here are some must-have kitchen essentials for making your beautiful breadsticks:
- Mixing bowls : You need a few—one for dry, one for wet winks.
- Baking sheet : This is where the magic happens! Line it with parchment paper for easy removal.
- Whisk and measuring cups : For those precise measurements—don’t just eyeball it!
If you’re in a jam and don’t have traditional tools—improvise! A good ol’ large saucepan can work as a mixing bowl, and a wooden spoon can help replace a whisk.
Lastly, remember to prep your dough effectively. knead it until smooth, let it rise patiently, and, when ready, freeze extras in air-tight freezer bags.
Trust me, you’ll thank yourself later when you can just whip out those frozen breadsticks for a quick snack or side dish!
Alright, we’ve covered how to make your kitchen a haven of tasty breadsticks in no time! now that we’re armed with quality ingredients and tools, let’s jump into the step-by-step instructions for crafting those irresistible golden garlic frozen breadsticks .
You’re gonna love it!
Mastering Professional Cooking Methods for Fluffy Breadsticks
So, you're ready to tackle some homemade garlic breadsticks ? alright, let’s dive into the nitty-gritty of professional cooking methods so we can get those fluffy, buttery beauties on the table.
I promise it’ll be easier than you think!
Essential Preparation Steps
Mise en place is your kitchen bestie. it sounds fancy, but it's just a way to say, "get all your ingredients ready first.
" measure out your 4 cups of flour , have your active dry yeast on standby, and get that olive oil measured.
It’s all about making your cooking process smooth and stress-free.
Now, let's talk about time management . when you’re making something like easy breadsticks from scratch , you want to maximize your time.
Try to prep your ingredients while your dough is rising. that way, you’re not twiddling your thumbs waiting for the yeast to work its magic!
Organization strategies are key too. keep your workspace clean and tidy. no one likes hunting for a measuring cup when the dough is ready to knead! and don't forget safety.
Keep your area dry to prevent slips, especially after applying that delicious garlic butter topping .
Step-by-Step Process
Ready? Let’s break it down step-by-step.
- Activate Yeast: Combine 1½ cups of warm water ( 110° F) with sugar and yeast. Let it froth up for 5- 10 minutes . That’s where the magic starts!
- Mix Dough: Combine your flour and salt in a large bowl, add the yeast mixture, and olive oil. Stir until combined and hold onto that anticipation!
- Knead Dough: Dump it out onto a floured surface. Knead about 5- 7 minutes until it’s smooth and elastic. You’ll know it’s ready when it feels springy!
- First Rise: Place it in an oiled bowl, cover it, and let it rise in a warm spot. It should double in size in about 1 hour .
- Shape Breadsticks: Punch down that dough! Divide into 12 pieces and roll each into around a 6-inch stick .
- Second Rise: On a lined baking sheet, let those beauties rise for another 30 minutes .
- Preheat Oven: Heat it up to 375° F ( 190° C).
- Prepare Garlic Butter: Melt butter and mix in minced garlic and parsley. Just the smell alone will tempt you!
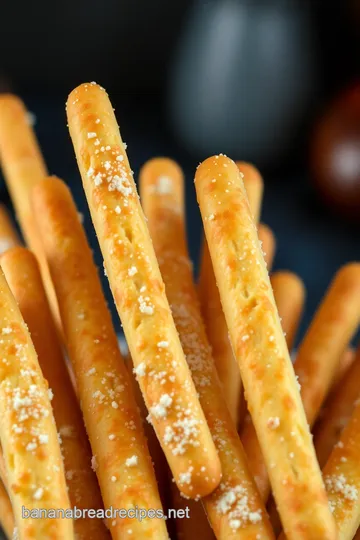
- Bake: Brush each breadstick with that garlic goodness and bake for 15 minutes until golden.
- Freeze (Optional): If you’ve made more than you can eat, cool them and store in freezer bags for later!
Expert Techniques
To nail that professional touch, here are some expert techniques. first, keep an eye on your dough during rising; it should double in size.
If it doesn't, your yeast might not have activated properly (shocking, i know).
Quality checkpoints : A perfectly baked breadstick should have a warm, golden exterior and be fluffy on the inside. A trick is to tap the bottom; a hollow sound means it's done.
Stuck on how to rescue your sad breadsticks? if they rise too little, knead them a bit more and try letting them rest again.
Cooking with yeast can be a bit finicky, but the reward is so worth it!
Success Strategies
Want perfect results every time? Here are your go-tos.
Avoid common mistakes. Don’t let your water be too hot or too cold when activating yeast— ideal temperature is around 110° F . This little detail can make all the difference.
Trust me, keeping a log of your baking experiences (what worked well and what didn’t) can be a gold mine for your future breadstick adventures.
Looking for make-ahead options? that’s easy with frozen breadsticks . just prepare, let them go through the first rise, punch down, shape them, then put them in airtight freezer bags.
You’ll have freezer-friendly meals at your fingertips!
When you’re ready to serve, pop them in the oven, and reheat those frozen treasures for around 10- 12 minutes .
They’ll be nearly as fresh as the day you baked them!
As you level up your breadstick game , remember: it's all about the practice and knowing your dough. Stay tuned for more tips and tricks in our next section: Additional Information!

Save Time in the Kitchen: Tips for Golden Garlic Frozen Breadsticks
Ah, golden garlic frozen breadsticks . just saying that makes me smile! there’s something about freshly baked breadsticks that fills your home with warmth, right? and the best part? you can whip up a batch, toss them in the freezer, and enjoy them fresh later.
Today, let’s chat about some pro tips, presentation ideas, storage, and even a few creative variations. seriously, you're gonna want to bookmark this!
Chef's Secrets to Perfect Breadsticks
First off, let’s get into a few pro tips . the key to fluffy breadsticks? it all comes down to the yeast activation process .
Make sure your water is warm but not scalding; aim for about 110° f ( 43° c) . if it’s too hot, you're going to kill the poor little yeast, and we can't have that! trust me, i’ve had my fair share of flop dough days, and it wasn’t cute.
Time-saving techniques? If you can, make a double batch and freeze some. Not only will this help you with quick snack ideas down the line, but who doesn’t love the smell of baking bread?
Flavor enhancement tips: don’t skimp on the garlic in that garlic butter topping ! more garlic equals more joy, my friends.
Also, a sprinkle of freshly chopped herbs like parsley or a touch of rosemary and thyme can elevate those breadsticks to gourmet status in no time.
Make 'Em Look Good!
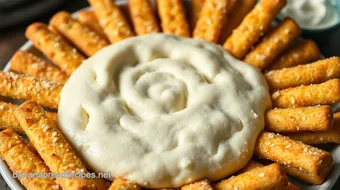
Okay, presentation advice . the way you plate those breadsticks can make a difference. think a rustic wooden board with a little bit of melted butter in a cute bowl on the side for dipping.
Trust me, it ups the visual appeal and makes for great instagram fodder!
For a pop of color, you might want to drizzle some olive oil over them after baking and adorn them with a sprinkle of fresh herbs.
That splash of green looks so inviting!
Best Ways to Store and Meal Prep
Now let’s talk storage and make-ahead instructions. after you bake your breadsticks, allow them to cool completely on a wire rack.
Once they’re cooled, pop ‘em into air-tight freezer storage bags. just make sure to label them; no one wants to play the “what’s in this bag?” game later.
For reheating frozen breadsticks , the oven is your best friend. preheat to 375° f ( 190° c) , pop them in for about 10- 12 minutes , and voilà! you’ll have crispy, warm breadsticks that taste just like they came out of the oven.
Variations on a Classic
Feeling adventurous? Let’s explore some creative variations . Love cheese? Toss in some shredded mozzarella or even make cheesy garlic breadsticks by topping them with cheese before baking. Isn’t that drool-worthy?
For a fall twist, why not incorporate pumpkin puree into your dough? it adds a nice flavor and keeps everything super fluffy.
You could also infuse some flavored bread recipes by adding spices like cinnamon or nutmeg.
Nutritional Insight
So, what’s in these bad boys? here’s the skinny on the complete nutrition guide : one breadstick typically has about 150 calories , making them a relatively guilt-free indulgence! plus, they provide carbs to fuel your day.
Just be mindful of the portions; even the fluffiest breadsticks should be enjoyed with balance.
Answering Your Burning Questions!
Now, let’s tackle some expert faq solutions . a common question is, “why did my dough not rise?” the most likely culprit is the yeast activation process .
Double-check your water temperature next time. if your breadsticks turn out too dense, it could be a kneading issue. ensure you’re kneading until they’re smooth and elastic – it makes a huge difference!
If your breadsticks come out a little too salty, try using less salt in the garlic butter next time. Baking is all about tweaking and finding what works for you!
Final Thoughts
So, my friend, there you have it! a simple, joyful way to enjoy frozen breadsticks at home. these tips and tricks are here to guide you, whether you’re a baking newbie or a seasoned pro.
I encourage you to dive in, experiment, and find your favorite variation of these delicious little snacks. they’re sure to become a family favorite, too.
Happy baking, and may your kitchen always smell like heaven!
Golden Garlic Frozen Breadsticks Card
⚖️ Ingredients:
- 4 cups all-purpose flour (500g)
- 1 packet (2¼ teaspoons) active dry yeast (7g)
- 1 teaspoon salt
- 1 tablespoon sugar
- 1½ cups warm water (110°F/43°C) (360ml)
- 2 tablespoons olive oil (30ml)
- ½ cup unsalted butter (113g), melted
- 4 cloves garlic, minced
- 1 teaspoon dried parsley (optional)
- ½ teaspoon salt
🥄 Instructions:
- Step 1: In a small bowl, combine warm water, sugar, and yeast. Let stand for 5-10 minutes until frothy.
- Step 2: In a large bowl, combine flour and salt. Add the yeast mixture and olive oil. Stir until combined.
- Step 3: Transfer dough to a floured surface and knead for about 5-7 minutes until smooth and elastic.
- Step 4: Place dough in an oiled bowl, cover with a kitchen towel, and let it rise in a warm place until doubled in size, about 1 hour.
- Step 5: Punch down the dough, then divide it into 12 equal pieces. Roll each piece into a 6-inch long stick.
- Step 6: Place shaped breadsticks on a lined baking sheet. Cover and let rise for 30 minutes.
- Step 7: Heat oven to 375°F (190°C).
- Step 8: In a bowl, mix melted butter, minced garlic, parsley, and salt.
- Step 9: Brush each breadstick with garlic butter and bake for 15 minutes until golden.
- Step 10: Allow breadsticks to cool completely, then place them in a freezer-safe bag and freeze.
Previous Recipe: How to Make Crispy Frozen Texas Toast in Air Fryer: A Delicious DIY
Next Recipe: My Grandmother's Garlic Bread: 5 Delicious Nutrition Facts to Savor