Irresistible Garlic Toast Recipe
Discover the irresistible flavors of garlic toast that my grandmother perfected. With just 250 garlic toast calories per serving, it’s simply delicious!

- The Essence of Garlic Toast: A Satisfying Crunch
- Your Go-To Ingredients Guide: Mastering the Essentials
- Mastering the Art of Garlic Toast: A Cook's Delight
- Pro Tips & Secrets to Garlic Toast Perfection
- Perfect Presentation: Elevate Your Garlic Toast
- Storage & Make-Ahead: Enjoy Garlic Toast Anytime!
- Creative Variations: Spice Up Your Garlic Toast
- Complete Nutrition Guide
- Expert FAQ Solutions
- Encouraging Conclusion
- Recipe Card
The Essence of Garlic Toast: A Satisfying Crunch
Picture this: a cool saturday evening. you’re snuggled up on the couch, watching your favorite movie with your loved ones.
Suddenly, the aroma of warm, buttery garlic toast wafts through the air, curling around you like a blanket. can you resist? i sure can’t! garlic toast has a way of turning any simple meal into something special.
Honestly, just thinking about it makes my mouth water.
Let’s chat about garlic toast calories for a second. you know, that crispy, crunch bite of deliciousness comes with a few calories, but they’re totally worth it.
This classic recipe, rooted in italian cuisine, has become a staple in american households, whether you’re whipping it up for game night or serving it alongside a cozy pasta dinner.
The Allure of Garlic Toast
So, where did this heavenly treat come from? garlic toast, or its fancier cousin traditional garlic bread , traces its origins back to savory italian kitchens, where garlic and bread were culinary best friends.
Fast forward to today, and it’s a popular sidekick for pasta, soups, or just as a stand-alone snack. and guess what? it’s super easy to make.
We're talking a simple garlic toast recipe that even a novice whiz can master.
Preparation time? you’ll need just 10 minutes to prep and another 10 minutes to bake. ready in just 20 minutes , you can whip up this snack without breaking a sweat.
Plus, it’s easy on the wallet—just a few ingredients create a satisfying yield of about 4 servings (2 slices per serving).
Talk about a win-win!
Why You’ll Love Garlic Toast
Let’s get into the good stuff— the benefits . first off, this isn’t just a snack; it packs some serious garlic toast nutrition .
Garlic is known for its immune-boosting properties, not to mention that classic savory taste it brings to pretty much everything.
So, feel a little less guilty about those garlic bread calories !
Worried about the occasion? don’t be! this garlic toast is perfect for special occasions or family dinners, and it’s a hit at parties, too.
You can even jazz it up with various garlic bread variation recipes —think cheesy garlic toast or adding herbs for an aromatic twist.
Got some pasta? this is your go-to sidekick.
For when you feel like being health-conscious, i’ve got tips for a healthy garlic toast recipe . use whole-grain bread or opt for a low-calorie garlic toast by swapping butter for olive oil or a tasty butter alternative for garlic toast .
It still delivers that impressive flavor while cutting some calories.
What’s Next?
Ready to get cooking? before you hop into the kitchen, remember that garlic toast preparation time is quick and fun—just gather your ingredients, preheat that oven, and let’s get this done.
Trust me, once you dive into that crispy piece of heaven, you'll agree garlic toast is an essential in any cook's repertoire.
Up next, we’ll break down the ingredients you need to create this aromatic delight, making sure you have everything you need for the perfect plate of garlicky goodness .
Let's keep it simple and straightforward; after all, that’s what homemade garlic bread is all about!
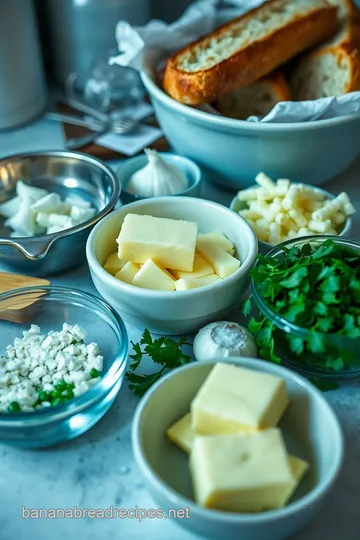
Your Go-To Ingredients Guide: Mastering the Essentials
Alright, friends! you know those moments in the kitchen when you realize you’re missing that one crucial ingredient? ugh! i've been there way too many times.
Today, i’m spilling the beans on what you need in your kitchen to make things smooth sailing. getting the fundamentals right can really elevate your cooking game!
Premium Core Components
Let’s dive into the premium core components that should always be on your radar. first up, measurements . whether you roll with the us (cups, tablespoons) or the metric (grams, liters) style, having a good conversion chart handy can save you from big boo-boos.
Now, let’s chat about quality indicators . look for vibrant colors and fresh aromas. for herbs, nothing beats that fresh zing! if it smells like heaven, you’ve got a winner.
As for storage , remember, keeping things cool and dry is your best friend. most spices last about a year if stored right—so don’t keep them forever!
To keep things fresh, always sniff and inspect before using. Trust me—your taste buds will thank you!
Signature Seasoning Blends
Next on our list, it’s the signature seasoning blend ! you wanna add that burst of flavor to your dishes, right? a solid essence of garlic and herb blend is like a musical note in your dish.
Think basil and oregano to liven up your spaghetti sauce or a dash of cumin for tacos.
Don’t overlook those flavor enhancers either! a bit of citrus zest, perhaps? everything’s better with a touch of lemon juice or a sprinkle of sea salt.
Got a regional dish in mind? switch it up! southern bbq might need smoked paprika while italian feels right with a good ol’ garlic and basil combo.
Smart Substitutions
We’ve all been there— out of an ingredient and stuck with what you’ve got. don’t sweat it! here’s where smart substitutions come in.
Out of butter? you can easily use olive oil or coconut oil. looking for a lighter choice? try avocado spread instead.
Maybe you’re following a special diet? no problem! need something dairy-free? almond milk is a great substitute for regular milk in recipes, or you could even swap in vegan cheese in that homemade garlic bread.
Yup, the garlic flavor enhancement will still shine through.
Kitchen Equipment Essentials
Now, let’s not forget about the gear you need. your kitchen equipment essentials can really set you up for success.
Invest in a good set of knives, cutting boards (multiple ones—meat, veggies, bread!), and a solid mixing bowl.
If you’re feeling fancy, consider a food processor for those homemade garlic condiments that make your garlic toast even more epic.
And hey, if you don’t own a convection oven, your regular oven will still work like a charm for perfectly baked garlic bread .
Little Tips for Garlic Toast Demigods
We all love garlic toast , right? just don’t forget that a single slice can pack around 250 garlic bread calories (depending on how generous you are with that garlic butter spread)! if you're counting those garlic toast calories , opt for a low-calorie version by switching to whole grain bread and less butter.
Planning to serve garlic bread with meals? try whipping up a healthy garlic toast recipe that features olive oil instead of butter, and sprinkle it with fresh herbs for a delightful twist.
It’s all about those simple garlic toast recipes that could compliment your dinner perfectly.
And if you wanna stay on the lighter side, consider the garlic toast health benefits —garlic's got the goods when it comes to keeping you healthy!
Now, are you ready to dive into some delicious garlicky goodness? let’s summon our inner chefs and get cooking! grab your favorite bread and let’s explore how to make that garlic toast unforgettable.
Whether it's a cozy dinner idea with garlic bread or a fun party snack, i promise, once you nail this, you'll wanna make it all the time.
So, are you ready? let’s get to it!
Mastering the Art of Garlic Toast: A Cook's Delight
Oh my gosh, let’s talk about garlic toast! it’s such a simple yet iconic dish that can seriously up your dinner game.
Whether you're cozying up with a movie or throwing a party, this little piece of heaven is the perfect sidekick.
And, hey, it’s not just delicious—garlic toast comes with garlic toast calories that won’t break the bank. let’s dive into the world of garlic toast and make it happen!
Essential Preparation Steps
Before getting into the tasty parts, let’s chat about some essential steps. first off, that fancy french term mise en place ? it just means having everything ready to roll.
So, before you even think about preheating the oven— always 400° f ( 200° c) for garlic toast—make sure you've got your ingredients prepped.
That way, you'll breeze through the recipe like a pro.
Time management tips: You have about 10 minutes for prep and an additional 10 minutes for cooking . Don’t forget to set a timer—trust me, I've burnt my share of toast before!
Get organized! Lay everything out in front of you: butter, garlic, parsley, and your loaf of bread. Safety reminder: be careful with that knife when slicing the bread—slice away from yourself, okay?
Step-by-Step Process
Here’s your game plan for making the ultimate garlic toast. Ready? Let’s go!
-
Preheat the Oven: Set it to 400° F ( 200° C) —this is crucial for that golden-brown toasty goodness.
-
Mix the garlic butter: grab a bowl and combine 1/2 cup of softened butter (make it room temperature, buddy!), 4 cloves of minced garlic , parsley , salt , and pepper .
Be sure to mix it well—no one wants a clump of garlic in one bite!
-
Slice that Bread: Cut your French baguette into thick slices—about 1-inch thick is perfect. This keeps your toast hearty.
-
Spread the Love: Generously coat each slice with your garlic butter mixture. Don't skimp; be a spreader!
-
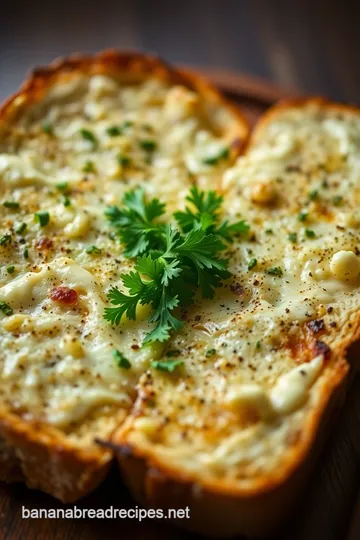
Bake It Up: Place your buttery masterpieces on a baking sheet and pop them in the oven. Bake for 8- 10 minutes . Watch closely—when the edges are bubbling, you're close!
-
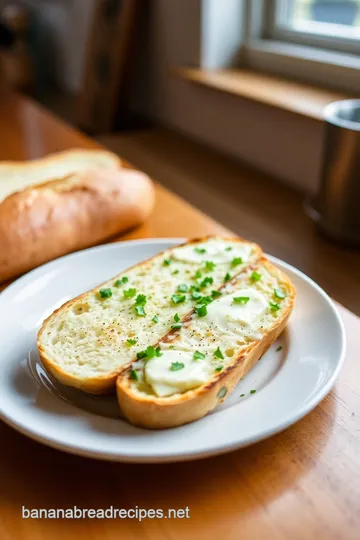
Serve Warm: That's it, you did it! Let them cool just a bit to avoid scorching your tongue.
Expert Techniques
Feeling fancy? Let’s step it up! Here are some pro tips:
- Temperature control: Remember that 400° F ( 200° C) is your best friend. You want that crisp without burning.
- Timing precision: Always keep your eye on the clock; a minute can make a huge difference.
- Visual cues for doneness: Look for that sizzling, golden edge—your nose will tell you it's almost time!
And if those slices do happen to brown too much? Just throw a little Parmesan on top next time to cover the burnt taste—trust me on this one!
Success Strategies
Now, let’s avoid pitfalls. Here are some mistakes to dodge:
- Forget the butter: This is vital for texture—without it, you’re just toasting bread!
- Inconsistent slices: If they’re not equal, some will burn while others remain soggy.
Quality assurance tips: Always taste everything along the way! And if you're looking for a healthier option, consider using butter alternatives for garlic toast like olive oil. It’s a game changer.
Garlic Toast Variations
Now, once you nail the basic garlic toast, the world’s your oyster! swap in different herbs or even cheeses . you could make a killer vegetarian garlic bread by tossing in some spinach or even using whole-grain bread.
Final Thoughts
Garlic toast is a cozy dinner's best friend and perfect for pretty much any occasion. whether you serve it as an appetizer or as easy side dishes with your main course, it always hits the spot.
And, in case you're counting those garlic bread calories , remember, it's not just about the taste but also the experience.
So what are you waiting for? Get in the kitchen, whip up this garlic toast, and impress everyone—your taste buds will thank you!
Feeling inspired? join me for the next chat where we’ll dig into more quick appetizer recipes and maybe even how to elevate your meals with our homemade garlic condiment recipes .
Stay tuned!
Pro Tips & Secrets to Garlic Toast Perfection
When it comes to making garlic toast , there’s that special ingredient that can elevate your dish from good to absolutely irresistible—besides the garlic itself! So let’s dive into some pro tips that’ll have your friends raving over your homemade garlic toast, giving them that “Holy cow, you made this?” feeling!
Chef’s Personal Insights
Oh my gosh, guys! always choose fresh garlic over the pre-minced stuff. there’s just no comparison. fresh garlic delivers that strong, aromatic kick that makes you double-dip into the butter one more time! when mixing that heavenly garlic butter spread , make sure your butter is softened—but not melted—so it mixes easily and goes onto the bread like a dream.
Time-Saving Techniques
Sick of waiting for the oven to preheat? Just broil the toast for a couple of minutes instead! Keep an eye on it, though. No one wants burnt toast—yikes!
Flavor Enhancement Tips
Adding a pinch of red pepper flakes to your butter will give your garlic toast a spicy twist that’ll knock your socks off.
And let's not forget about those herbs! fresh parsley is great, but you can shake things up with some dried oregano or basil for a little italian flair.
Trust me, your taste buds will thank you!
Presentation Advice
Now, for that pinterest-worthy finish! after pulling it out of the oven, let your garlic toast rest for a couple of minutes before plating.
This lets the flavors settle in. you can sprinkle some fresh herbs on top for a pop of color, and maybe a little grated cheese if you're feeling fun.
We eat with our eyes first, right?
Perfect Presentation: Elevate Your Garlic Toast
When you're serving up that beautiful batch of garlic toast, let’s pull out some tricks to make it shine .
Plating Techniques
Cut the toast into triangles or strips; it looks fancy and makes for great shareable bites. Plus, having a pile of golden slices in front of you? Total crowd-pleaser.
Garnish Ideas
A sprinkle of fresh parsley or even a drizzle of olive oil can make all the difference. you can also throw in some grated parmesan on top just before serving for extra ooey-gooey goodness.
Color Combinations
Pair that toasted bread with a vibrant, fresh salad on the side, like a garden salad bursting with colors. think tomatoes, cucumbers, and mixed greens.
It’ll not only look good but also balance the flavors!
Visual Appeal Tips
Make sure to serve your garlic toast on a wooden board or burst of color like a bright red plate. It’s a small detail that makes a huge impact!
Storage & Make-Ahead: Enjoy Garlic Toast Anytime!
Making garlic toast is quick, but what if you want it ready for those surprise guests?
Storage Guidelines
Keep any leftovers in an airtight container in the fridge for up to three days.
Preservation Methods
For longer storage, freeze the buttered bread slices before baking. They’ll be good in the freezer for about a month.
Reheating Instructions
Reheat in the oven at 375° F ( 190° C) for about 5- 7 minutes to get that crispy texture back. Can't have soggy toast, now can we?
Freshness Duration
Fresh garlic toast tastes best on the same day it’s made. But hey, if you have leftovers, don’t be shy! They still work as a fantastic late-night snack.
Creative Variations: Spice Up Your Garlic Toast
Feeling wild? Let’s switch things up!
Flavor Adaptations
What if you use flavored butter ? Herb-infused or truffle butter? Game-changer.
Dietary Modifications
For vegan pals, swap butter with a good olive oil or a vegan butter alternative . No garlic toast should be left behind!
Seasonal Twists
If it’s summer, throw some ripe tomatoes on top and bake for a stylish twist. In fall? A sprinkle of pumpkin spice mixed into your butter can be fun!
Regional Variations
How about a little cheese on top for that Cheesy Garlic Toast variety? You can never go wrong with mozzarella melting on top.
Complete Nutrition Guide
Alright, here’s the deal on how many calories you’re dealing with in this savory delight. Each serving (2 slices) hovers around 250 calories . Let’s break it down:
- Protein: 3g
- Fat: 20g
- Carbohydrates: 18g
- Fiber: 1g
- Sodium: 180mg
Health Benefits
Garlic has health benefits too! It may help boost your immune system and has been linked to heart health. Just don’t overdo it—your breath will thank you later!
Expert FAQ Solutions
Got questions? I’ve got answers!
Common Questions
Is this recipe hard? Nope! If you can spread butter, you can make this easy garlic toast recipe without breaking a sweat.
Troubleshooting Guide
If your toast isn’t crispy, try broiling it on high for a minute or two at the end. Works like a charm!
Success Tips
Always make sure to season your butter well, and keep an eye on it while baking.
Variations Explained
Not a huge garlic fan? You can simply tone it down or substitute with a bit of onion powder for a milder flavor.
Encouraging Conclusion
There you have it! your guide to the best garlic toast ever, with so many ways to jazz it up.
Perfect for any dinner, or even as a snack while binge-watching your favorite show. just remember those garlic toast calories —they can sneak up on you—but hey, live a little! whether you’re whipping it up as a side or enjoying a few slices by themselves, this garlic toast will surely become a staple in your kitchen.
So roll up those sleeves, grab some bread and garlic, and let’s get to toasting! 🥖
Irresistible Garlic Toast Recipe Card

⚖️ Ingredients:
- 1 French baguette (or Italian bread) (300g)
- 1/2 cup (113g) unsalted butter, softened
- 4 cloves fresh garlic, minced
- 1/4 cup (15g) fresh parsley, finely chopped
- 1/4 teaspoon salt (1.5g)
- 1/4 teaspoon black pepper (1g)
- Optional: 1/4 teaspoon red pepper flakes (1g)
🥄 Instructions:
- Step 1: Preheat your oven to 400°F (200°C).
- Step 2: In a small mixing bowl, combine softened butter, minced garlic, parsley, salt, and black pepper. Mix thoroughly until well combined.
- Step 3: Cut the baguette into 1-inch thick slices (approximately 8 slices).
- Step 4: Generously spread the garlic butter on one side of each slice of bread.
- Step 5: Place the bread slices, buttered side up, on a baking sheet lined with parchment paper.
- Step 6: Bake in the preheated oven for 8-10 minutes, or until the edges are golden brown and the butter is bubbling.
- Step 7: Remove from the oven and let cool slightly. Serve warm.
Previous Recipe: Ultimate Texas Toast Croutons: 5 Ways to Add Golden Crunch!
Next Recipe: How to Make Texas Toast: 5 Amazing Ways to Enjoy It!