Bake Cloverleaf Rolls: Fluffy & Buttery Goodness
Looking for the perfect dinner rolls? My homemade cloverleaf rolls are fluffy, buttery, and a true comfort food staple. Bake Cloverleaf Rolls: Fluffy & Buttery Goodness today!

- Warm Memories and Delicious Beginnings
- The Story Behind Cloverleaf Rolls
- What’s So Great About These Rolls?
- Perfecting Your Baking Skills
- Ready to Get Rolling?
- Essential Ingredients Guide
- Mastering the Art of Professional Cooking: Bake Cloverleaf Rolls
- Pro Tips & Secrets to Bake Cloverleaf Rolls: Fluffy & Buttery Goodness
- Perfect Presentation for Your Rolls
- Storage & Make-Ahead Tips
- Creative Variations on Cloverleaf Rolls
- Complete Nutrition Guide
- Expert FAQ Solutions
- Recipe Card
Warm Memories and Delicious Beginnings
Oh my gosh, have you ever whisked up a batch of freshly baked rolls and felt the warmth of home wrap around you like a cozy blanket? i remember the first time i attempted to bake cloverleaf rolls: fluffy & buttery goodness .
There was flour everywhere, my puppy was trying to sneak a bite, and i couldn’t have been happier. those rolls turned out soft, fluffy, and absolutely perfect.
It was like wrapping comfort food in a little ball of joy, and i knew i had stumbled onto something special.
If you're wondering how to create such a delicious culinary experience, let’s dive deeper. you'll discover just why these little rolls are such a hit in american kitchens.
Seriously, folks. there's a reason why these guys are a must-have at every family gathering. spoiler alert: they bring people together.
The Story Behind Cloverleaf Rolls
These delightful rolls have a rich history, tracing back to classic american baking. created as a way to use yeast dough effectively, the shape stands out and provides that beautiful golden crust we all know and love.
Cloverleaf rolls have become synonymous with holiday dinners and family gatherings. whether it's thanksgiving or a simple sunday dinner, these rolls steal the show.
What’s more? they’re surprisingly easy to whip up. seriously, if you can mix, knead, and shape dough, you can pull this off.
The time investment is minimal, with about 1 hour and 5 minutes total , inclusive of resting time. and you’ll end up with 12 rolls that will disappear faster than you can say, “who wants seconds?”
What’s So Great About These Rolls?
Let’s talk benefits. first off, these rolls are not just fluffy; they’re loaded with flavor. each bite offers a buttery richness that everyone loves.
You can be the superstar of any meal and serve these homemade cloverleaf rolls as the perfect side dish for dinner .
Seriously, they’re the unsung heroes of feasts everywhere.
Not to mention, they are packed with nutrition too! while they deliver on comfort, they also provide a source of carbohydrates that energize without that heavy feeling.
And if you ever worry about options, get this: they can be easily adapted. think garlic butter rolls or even sweet dinner roll variations with cinnamon and sugar.
Your creativity is the only limit!
And when it comes to occasions, you can serve these at anything! think potlucks, family reunions, or even a saturday night cozying up with your favorite movie.
No one can resist a warm roll right out of the oven!
Perfecting Your Baking Skills
If you’re new to baking with yeast , don’t fret! this recipe is meant for all levels. it’s a fantastic chance to learn kneading bread dough and yeast activation .
Want to know a secret? the key to success is making sure your milk is warm, about 110° f. this helps the yeast spring to life without turning it into instant yeast soup.
Trust me; i learned that the hard way.
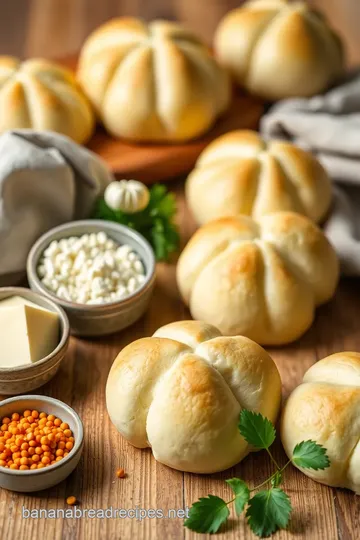
As you tackle the shaping part, don’t be intimidated by how to shape cloverleaf rolls . it’s super simple! just roll smaller pieces of dough and pop them into a muffin tin.
The unique shapes not only look great but also make for easy serving. you’ll impress everyone, trust me!
Ready to Get Rolling?
These fluffy yeast rolls are waiting for you to create some amazing memories. are you ready? let’s move to the ingredient list and gear up for some fun baking! whether it’s for a special gathering or a cozy night in, these rolls will become a staple.
So put on your apron and get ready to have some fun in the kitchen. it’s time to bake!
Essential Ingredients Guide
Baking can be either an exciting adventure or a total flop, right? when it comes to homemade cloverleaf rolls , getting your ingredients right is key.
So, let’s dig into the essentials. trust me, you’ll want to know the ins and outs before diving into these fluffy and buttery goodness rolls!
Premium Core Components
First things first—what’s in our rolls? Here’s what you need:
-
4 cups all-purpose flour (480g) : look for flour with a protein content around 10-12% for those light and airy rolls .
It needs to be fresh; a good rule is to check the expiration date.
-
1 packet instant yeast (2 ¼ teaspoons or 7g) : this is your secret to activating that fluffy bread texture .
Always store your yeast in a cool, dark place to keep it alive longer.
-
1 tablespoon granulated sugar (12g) : Helps the yeast activate and gives your rolls just a hint of sweetness.
-
1 teaspoon salt (5g) : Salt doesn’t just add flavor; it also strengthens dough strength. Use a good-quality sea salt when possible.
-
1 cup warm milk (240ml, about 110° f/ 43° c) : this gentle warmth helps awaken the yeast. if you find it a tad hot, let it cool! you don’t want to end up with a sad, inactive yeast mess.
-
1/4 cup melted unsalted butter (56g) : This bad boy gives us that rich buttery flavor . Always nice and fresh!
-
1 large egg (room temperature) : It brings moisture and structure to your rolls.
Knowing how to store these ingredients is essential, too. Flour lasts best in an airtight container, while milk should always live in the fridge—so don’t forget it on the counter!
Signature Seasoning Blend
What’s better? Get creative with seasonings!
-
Garlic powder : If you want to amp up the flavor, sprinkle this on top before baking. Who doesn’t love a garlic butter roll ?
-
Herbs : Try mixing in some fresh rosemary or thyme—a nice twist for dinner parties or holiday gatherings. It’s one of those comfort food recipes that’ll impress grandma!
Smart Substitutions
Okay, we’ve all been there. You start baking only to realize you’re out of an ingredient.
-
Milk replacements : Almond or oat milk can work in a pinch. Just warm it up like you would regular milk.
-
Butter : Coconut oil or a vegan butter will do just fine if you're avoiding dairy.
-
Flour : Not all flour is created equal! Whole wheat flour can replace half of the all-purpose for added nutrition without losing too much fluff.
-
You can even throw in some cheese for a savory twist, or sweet dinner roll variations like a hint of cinnamon for added warmth.
Kitchen Equipment Essentials
Let’s talk tools!
You’ll need some must-have equipment to make those cute puffed cloverleaf rolls .
-
Mixing bowls : A couple of them in different sizes are a must-have.
-
Measuring cups and spoons : Precision is key, especially in baking.
-
Muffin tin : The classic choice for shaping our rolls. Use non-stick spray or grease well to avoid sticking!
Also, a kitchen towel or plastic wrap will do wonders for keeping your dough cozy while it rises. Kitchen items can often be timeless. I promise the right tools make everything smoother!
Making Those Flaky Goodness Rolls
Now that you know what to grab, you're one step closer to enjoying bake cloverleaf rolls : fluffy and buttery goodness .
With these tips on hand, you’ll bake like a pro in no time. remember, baking is all about practice . the more you do it, the better you get!
In our next section, let’s jump into the step-by-step instructions on how to shape those cloverleaf rolls and make your kitchen smell heavenly. Grab your ingredients, and let’s get rolling!

Mastering the Art of Professional Cooking: Bake Cloverleaf Rolls
When it comes to baking, there’s something magical about those fluffy, buttery rolls that grace the dinner table. you know the ones i’m talking about— cloverleaf rolls ! they’re the ultimate comfort food, perfect for holiday dinners or just an everyday family meal.
Let’s dive into the simple yet essential methods to make these delightful rolls sing.
Essential Preparation Steps: The Backbone of Great Baking
First things first, you're gonna want to nail the mise en place , which just means having all your ingredients measured and ready to go.
It sounds fancy, but it's just good practice! trust me, you'll thank yourself when you’re in the zone and everything's prepped.
Now, let’s chat about time management. set timers for each stage, especially during those rising times. there’s nothing worse than getting lost in your netflix binge and forgetting about your dinner roll dough ! aim for about 30 minutes for the first rise and 15- 20 minutes for the second rise.
Quick tip: use your phone’s timer—it's a lifesaver!
Organization is key. have your tools ready—mixing bowls, measuring cups, and muffin tins all lined up. don’t forget the safety considerations too! always use oven mitts when you’re pulling those puffy rolls out of the oven.
Safety first, y’all!
Step-by-Step Process: Let’s Get to Work
Alright, here’s how it goes down. Grab your mixing bowl and follow these steps:
-
In a large bowl, mix 4 cups of all-purpose flour , 2 ¼ teaspoons of instant yeast , 1 tablespoon sugar , and 1 teaspoon salt .
-
In another bowl, whisk together 1 cup of warm milk (about 110° F) , 1/4 cup melted butter , and 1 large egg .
-
Throw the wet mix into the dry mix and stir until it comes together like a happy family.
-
Now, it’s time to knead that dough! transfer it to a floured surface or use a stand mixer. knead for about 5- 7 minutes until it’s smooth and elastic.
If you’re using a mixer, give it about 5 minutes on medium speed.
-
Place your dough in a greased bowl, cover, and let it rise in a warm spot for around 30 minutes until it’s doubled in size.
Think of it like letting a good idea grow!
-
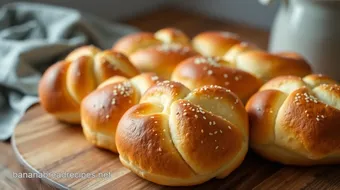
Preheat that oven to 375° f . punch down your dough (this feels oddly satisfying) and shape it into 36 small balls .
You'll group three balls together and pop ‘em into a greased muffin tin.
-
Cover those little guys again and let them rise for another 15- 20 minutes until they look all puffed up and ready to bake.
-
Brush them with melted butter (maybe add some garlic powder if you're feeling fancy) and bake for about 15- 20 minutes .
-
They’re done when they’re golden brown on top. When you tap them, they should sound hollow—like a roll version of a rock concert.
-
Brush with more butter right when they come out. Honestly, can you even call it dinner without that extra bit of buttery goodness?
Expert Techniques: Tips from the Pros
You want that perfect texture, right? Here are a few pro tips:
- Always check the temperature of your yeast . Too hot and it’ll die; too cold and it won’t wake up. Aim for that 110° F mark!
- Think about incorporating flavors—add herbs or even cheese to the dough for a twist.
- If you’ve never kneaded dough before, check out some videos on rolling techniques . It's easier than you think!
Success Strategies: Avoiding Pitfalls
We've all been there—dough not rising, rolls too dense, you name it. Here’s how to dodge those mistakes:
- Don’t rush the rising process. Patience is a virtue here.
- Make sure your ingredients are fresh, especially the yeast ! It won't activate properly if it’s old.
- If you mess up, don’t stress! You can turn flat rolls into a savory bread pudding . Hey, luck is part of cooking!
Conclusion: Let’s Bake Some Happiness
Baking cloverleaf rolls is like creating your own slice of happiness. they're perfect as a side dish to most meals and a quick yeast roll option if you need something kid-friendly.
Plus, they pair so well with soups, salads, or just a light spread of butter!
So grab your apron, rally your kitchen crew, and let’s bake cloverleaf rolls: fluffy & buttery goodness . once you've mastered these rolls, trust me, you’ll be the hero of every dinner table.
Keep it fun, keep it relaxed, and don’t forget to enjoy the process!
Next up, we’ll dive deeper into some additional information on how to elevate your baking game, because who doesn’t want to become a kitchen rock star?
Pro Tips & Secrets to Bake Cloverleaf Rolls: Fluffy & Buttery Goodness
Oh my gosh, you guys! if you're diving into making cloverleaf rolls, you’re in for a treat. i’ve spent years perfecting these soft dinner rolls, and let me tell you, there are some serious secrets to getting them to that perfect level of fluffiness.
Chef's personal insights
first things first, don’t rush the rising process. letting the dough rise properly is what gives you those fluffy yeast rolls .
Feel free to stick your finger in the dough after it’s risen. if it springs back, you’re golden! if it doesn’t, it needs more time.
Trust me; patience pays off here.
Time-saving techniques
if you’re in a hurry, you can prepare your dinner roll dough the night before. just let it rise in the fridge.
The next day, pull it out, shape it into your lovely cloverleaf forms, and let it do its thing for a bit before baking.
You’ll thank me when it’s time to serve!
Flavor enhancement tips
want your rolls to have that extra oomph? try adding a teaspoon of garlic powder or even some fresh herbs to the dough while mixing.
You’ll end up with garlic butter rolls that will leave everyone asking for more.
Presentation advice
now that you’ve got those rolls ready, let’s make them pretty. brush them with melted butter before baking, and your kitchen will smell amazing.
Once they’re out of the oven, a sprinkle of sea salt or fresh herbs on top gives that pop of color and flavor that makes them look like they came straight from a fancy bakery.
Perfect Presentation for Your Rolls
Creating a visually appealing plate isn’t just Instagram bait ; it also makes the meal feel more inviting. Here are some tips to get that wow factor.
Plating techniques
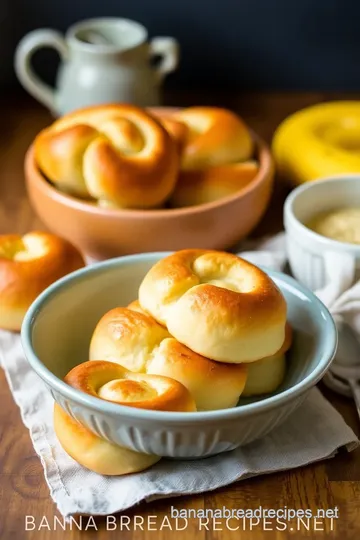
when arranging your homemade cloverleaf rolls , think about height and color. stack a few slightly askew for a cozy, casual look.
You know, like your family’s been snacking on them all night (which they probably will!).
Garnish ideas
a sprig of fresh parsley on the side or a dollop of herb-infused butter can spice up your presentation.
It adds that final touch, making it a feast for the eyes.
Color Combinations
Think of your meal as a canvas. Pair those flaky buttery rolls with vibrant veggies or a colorful salad to create a rainbow on the plate.
Storage & Make-Ahead Tips
We all want our baked goodies to last, so let’s talk smart storage.
Storage Guidelines
These dinner rolls can live in an airtight container at room temperature for up to two days. Just make sure they stay wrapped; nobody likes stale bread!
Preservation Methods
For longer storage, toss those rolls in the freezer, and they’ll be good for about three months. Just thaw them in the fridge overnight when you're ready to devour.
Reheating Instructions
Heat them in a 350° F ( 175° C) oven for about 10 minutes. They’ll taste just like fresh out of the oven!
Creative Variations on Cloverleaf Rolls
The great thing about a cloverleaf roll recipe is it’s so versatile! Here are some fun variations you can try.
Flavor Adaptations
Ever thought about making cheesy bread recipes ? Toss in your favorite shredded cheese, and you’ll have a savory delight that pairs well with soups.
Dietary Modifications
For those wanting a lighter version, try using half whole wheat flour. It’ll still be delicious while packing in some extra nutrients.
Seasonal Twists
Around the holidays, add a hint of cinnamon or nutmeg to the dough for a festive vibe. These variations on dinner rolls will have everyone reaching for seconds.
Complete Nutrition Guide
Learning about what you’re eating is always a good idea, especially when dealing with comfort food recipes like these rolls.
Detailed Breakdown
Each roll packs about 160 calories , but you know what? The memories you create around the table make them calorie-free, right?
Health benefits
the homemade cloverleaf rolls bring you carbohydrates for energy and can be made healthier depending on the flour you use.
Whole wheat provides more fiber, making them a solid side choice.
Portion Guidance
Keep in mind that these fluffy rolls are best enjoyed in moderation. Aim for two or three at dinner, especially if paired with soups or salads.
Expert FAQ Solutions
Got questions? I’ve been there, and here are some success tips from my kitchen journey.
Common Questions
How to shape cloverleaf rolls? Easy! Just roll your dough into small balls, group them, and plop 'em in the muffin tin. They do the rest!
Troubleshooting Guide
If your dough isn’t rising, double-check that your yeast is still good. Early expiration could mess things up big time!
In the end, baking cloverleaf rolls is not just about the result. it's about the journey, the aroma filling your home, and the warm smiles at the dinner table.
Whether it's for a holiday gathering or just a cozy night in, these soft dinner rolls will warm hearts and fill bellies.
So roll up those sleeves, channel your inner baker, and get ready to bake cloverleaf rolls: fluffy & buttery goodness .
You got this!
Bake Cloverleaf Rolls: Fluffy & Buttery Goodness Card
⚖️ Ingredients:
- 4 cups all-purpose flour
- 1 packet instant yeast (2 ¼ teaspoons)
- 1 tablespoon granulated sugar
- 1 teaspoon salt
- 1 cup warm milk
- 1/4 cup unsalted butter, melted
- 1 large egg, room temperature
- 2 tablespoons unsalted butter, melted (for topping)
- 1 teaspoon garlic powder (optional)
🥄 Instructions:
- Step 1: In a large mixing bowl, combine flour, yeast, sugar, and salt.
- Step 2: In a smaller bowl, whisk together warm milk, melted butter, and the egg.
- Step 3: Pour wet ingredients into dry ingredients and mix until a dough forms.
- Step 4: Transfer dough to a floured surface or stand mixer. Knead for 5-7 minutes until the dough is smooth and elastic.
- Step 5: Place the dough in a greased bowl, cover with a kitchen towel or plastic wrap, and let it rise in a warm place for 30 minutes.
- Step 6: Preheat oven to 375°F (190°C). Punch down the dough and turn it out onto a floured surface.
- Step 7: Divide the dough into 36 equal pieces and roll each piece into a ball, grouping three balls together.
- Step 8: Place them into greased muffin tin cups, cover with a towel, and let rise for another 15-20 minutes.
- Step 9: Brush tops with melted butter and garlic powder, if using, then bake for 15-20 minutes until golden brown.
- Step 10: Remove from oven, brush again with melted butter, and let cool slightly before serving.
Previous Recipe: How to Bake Soft Cinnamon Rolls with Creamy Frosting: A Delicious Family Tradition
Next Recipe: How to Make Cooked Apples Granny Smith Quick Sauce: A Delicious Twist!