My Favorite Quick Banana Scones
Wondering how to make the best Banana Scones? This quick & delicious recipe brings the warmth of my kitchen to yours. Enjoy baking with your loved ones!

- The Joy of Baking Banana Scones
- A Little History Behind Scones
- Key Benefits of Banana Scones
- Time to Get Started
- Your Go-To Guide for Essential Ingredients
- Unleashing the Secrets of Professional Cooking
- Pro Tips & Secrets for Baking Banana Scones
- Perfect Presentation: Serving Up Scones Like a Pro
- Storage & Make-Ahead Options
- Creative Variations: Time to Get Funky!
- Complete Nutrition Guide
- Expert FAQ Solutions
- Wrapping It Up
- Recipe Card
The Joy of Baking Banana Scones
Oh my gosh, picture this: it’s a cozy saturday morning. the sun is just peeking through the windows, and the warmth of the kitchen is calling to me like an old friend.
I've got a couple of overripe bananas sitting on the counter, and suddenly it hits me— bake banana scones: quick & delicious recipe ! seriously, have you ever smelled fresh scones baking? it’s like a hug for your nose! so, let’s dive into this delightful world of banana goodness together.
A Little History Behind Scones
Scones trace back to the british isles, where they’ve been popular for centuries. traditionally, they were baked on a griddle, but now the oven reigns supreme.
Nowadays, scones aren’t just reserved for high tea—they’ve made their way into kitchens everywhere, especially in america. this banana scone recipe puts a fun spin on the classic, introducing the sweetness of ripe bananas to the mix.
You know, when life gives you overripe bananas, make some delicious baked treats !
These homemade banana scones are simple to whip up and still feel fancy enough for a brunch spread. all you need is about 35 minutes , and you’re in business.
Just 15 minutes of prep and 20 minutes of baking, and voilà! you have 8 soft banana scones ready to be enjoyed.
Plus, the ingredients are super budget-friendly! with a few staple pantry items, you’ll have a delightful treat that won’t break the bank.
Key Benefits of Banana Scones
Now, let’s get to the good stuff: why you need these scones in your life. first off, nutritional highlights ! bananas bring you potassium and other vitamins, making these scones a step above your average sweet treat.
You’ve got a bit of fiber from the bananas, too. so, while these are definitely comfort food, they can be a bit of a guilt-free indulgence—especially if you cut down on the sugar.
Win-win, right?
What’s more, these banana scones are perfect for family-friendly recipes ! kids love them, and hey, they’re easy enough for the little ones to help out with.
They also make a great breakfast or snack—the kind of food you don’t mind your buddies munching on during a weekend brunch! you can pair them with clotted cream or slap on some jam.
Talk about options!
The beauty of this easy scone recipe lies in its versatility. don’t be afraid to mix it up! add chocolate chips, nuts, or some spices for a unique twist.
There’s a whole world of sweet scone variations just waiting!
Time to Get Started
Alright, enough talk—let’s get those taste buds tingling! if you're new to baking, don’t worry about a thing. these scones are simple to make.
You'll find scone baking tips scattered throughout the recipe that will guide you through to perfect results.
So, grab those ripe bananas and gather the scone ingredients because we're about to turn them into delicious banana scones .
Trust me, once you’ve baked these beauties and taken that first bite, you’ll be hooked. not only are you satisfying your cravings, but you’re also learning how to bake scones like a pro!
Get ready to enjoy a treat that’s as cozy and comforting as your favorite sweater. and remember, these banana scones aren't just for mornings—snack ideas for kids or a sweet afternoon treat will do just fine.
Let’s dive into what you need to make this heavenly scone adventure happen!
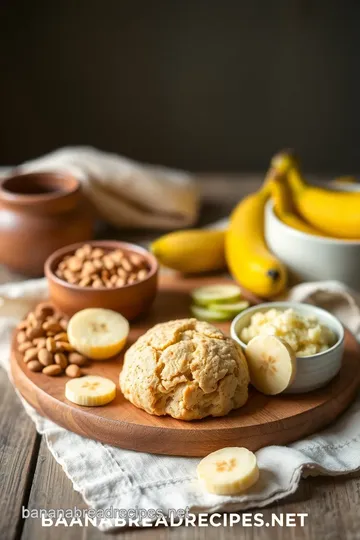
Your Go-To Guide for Essential Ingredients
So, you're ready to whip up something delicious? whether you're just starting out or you're a seasoned pro in the kitchen, having premium core components on hand can make a world of difference.
Trust me, nothing is more frustrating than getting halfway through a recipe and realizing you're missing crucial ingredients! here’s a breakdown to keep your pantry stocked and ready for action.
Premium Core Components
First up, let’s get into the nitty-gritty of ingredient measurements. It’s super important to know that:
-
2 cups (250g) of all-purpose flour can be a game changer. If you’re in the UK, that’s about 250g . Don't sweat it if you're new to weighing things, just grab a cup measure and fill 'er up!
-
When it comes to fresh ingredients, like bananas, always look for signs of ripeness. you want them spotted and soft for that sweet, delicious flavor.
Trust me, using ripe bananas will elevate your banana scone recipe.
Now, let’s chat about storage. keep spices and dried herbs in a cool, dark place. they won’t last forever, so check that they’re still fragrant.
Most of them have a shelf life of about 6-12 months , but ground spices might start losing their punch after a few months.
Signature Seasoning Blend
Ah, the magic of spices! if you want to elevate flavors like a rockstar chef, having a solid signature seasoning blend goes a long way.
Think about combining cinnamon, nutmeg , and maybe even a pinch of cardamom for those soft banana scones. these are some killer flavor enhancers!
When working with herbs, parsley and thyme go together like PB&J. For those banana baked goods , you might skip the herbs and stick with warming spices that complement your bananas.
Smart Substitutions
We’ve all been there—standing in front of our pantry, wishing for an ingredient we don't have. No worries! You can whip up common alternatives that will still give you that bomb flavor.
For instance, if you’re short on baking powder, you can use baking soda paired with vinegar as your emergency replacement.
Or if you’re out of buttermilk, just add a splash of vinegar to regular milk for a quick substitute.
And hey, if someone in your family can’t do gluten, swap in a gluten-free flour blend ! There’s always a way to adjust for dietary needs without missing a beat.
Kitchen Equipment Essentials
Your kitchen is like your toolkit, and there are definitely some must-have tools that’ll save you time and frustration. trust me, you want a good mixing bowl and a sharp knife for chopping.
A pastry cutter or even a fork is handy for cutting butter into your flour, especially if you're looking to achieve those flaky scone textures .
Got limited space? Use your baking sheets wisely and maybe invest in some nesting measuring cups . They store easy and work like a charm.
Wrapping It Up
Now that you’re armed with this essential ingredients guide, you're well on your way to making some killer scones! with just a little prep, you're taking the steps to bake banana scones: quick & delicious recipe .
These babies will be the highlight of your breakfast or snack time, for sure!
Ready to dive into the recipe and bring that delicious aroma of freshly baked banana scones wafting through your kitchen? Trust me, your family will thank you for this ultimate comfort food recipe ! Let's get baking and see how much fun we can have mixing up those ingredients!
Unleashing the Secrets of Professional Cooking
When it comes to professional cooking, there’s a lot to learn, but don’t worry—i’m here to guide you through it in a way that feels friendly and fun! a lot of the magic happens before you even turn on the oven.
Let’s chat about the essentials of getting ready.
Essential Preparation Steps
First off, you gotta get your kitchen in shape. this is where mise en place comes in. sounds fancy, right? but really, it's just the french term for "everything in its place.
" lay out all your ingredients and tools before you start cooking. it makes a world of difference!
Next, let’s talk time management . ever find yourself scrambling at the last minute? pro chefs plan every minute. for example, if you need 15 minutes to prep your ingredients and 20 minutes to cook those delicious banana scones , work it out before you start.
It’s like playing chef tetris—fit everything together strategically!
Now, for keeping organized, use bowls for your dry and wet ingredients. this little trick can save you from a messy counter and a disaster in the oven.
Oh, and don’t forget about safety considerations . keep those knives sharp and your cutting board steady. you’d rather chop onions than fingers!
Step-by-Step Process
Now, onto the fun part—the cooking! Here’s a short and sweet version of a scone-making process. Let’s say you’re following that Banana Scone recipe we love.
-
Preheat your oven to 400° F ( 200° C) . Pro tip: starting with a hot oven helps those scones puff up nicely.
-
Combine all your dry ingredients in a bowl. Make sure it's mixed well! This part is crucial. If you've got lumps, your scones can be a little funky.
-
Cut in some cold butter until it looks crumbly. You want that flaky texture—think of a cozy blanket.
-
Now, whisk together your mashed bananas, buttermilk, egg, and vanilla in another bowl. This is where the sweet scone magic begins.
-
Fold in the wet and dry ingredients gently. No overmixing—you're looking for a nice dough that holds together.
-
Shape the dough, pat it out to about 1-inch thick , and slice it into wedges. Lay ‘em on a baking sheet and sprinkle with sugar if you’re feeling fancy.
-
Bake for 15- 20 minutes until they’re golden brown and a toothpick comes out clean.
Expert Techniques
What makes pro cooks stand out? Experience and finesse! Here are a few techniques that might help you elevate your scone game.
-
Watch your temperature —your oven should be at that sweet spot of 400° F ( 200° C) . Not too hot, not too cold.
-
Trust your gut when it comes to timing. Check in on those scones about halfway through.
-
Use visual cues! Golden edges are a good sign, just don’t overdo it.
-
Got a problem? Like those scones sinking in the middle? Maybe your butter was too warm. Learn from those little mishaps. They teach you more than a perfect bake ever could!
Success Strategies
Mistakes? We’ve all been there! A common one is overmixing the dough. That could lead to tough banana scones rather than soft and fluffy ones. Keep it light!
For quality assurance , make sure your ingredients are fresh. Ripe bananas are your best friend here; they pack that awesome flavor we all love.
If you want to give your family a treat ahead of time, many of these scones freeze beautifully. just pop them in a bag after they cool.
Then, when you want a magical breakfast, heat them back up!
So, when you’re ready to bake banana scones: quick & delicious recipe , remember: simplicity is key. with a few steps and some attention, you're bound to create homemade banana scones that will have everyone asking for more.
Think you can whip this up for a last-minute breakfast? i know you can! as we get ready to bake, there’s always more to learn about the world of cooking.
Stay close for additional info on how to master these delicious baked treats!
Pro Tips & Secrets for Baking Banana Scones
Oh my gosh, if you haven’t tried to bake banana scones: quick & delicious recipe , you’re in for a real treat! but before you dive right in, let me share some pro tips that’ll take your scone game from zero to hero.
First off, use overripe bananas . seriously, they’re sweeter and more flavorful! i swear by this. and if you’re short on time, mix your dry ingredients the night before.
Just grab them from the pantry, throw everything together, and it’s smooth sailing!
When it comes to cutting in that cold unsalted butter , have a quick tip: work fast! you want it to stay cold; that’s what gives you those delightful flaky layers.
Oh! and don’t even think about overmixing. you want to fold the wet and dry ingredients together just enough so they barely combine .
If the dough sticks, you can gently knead it a couple of times, but aim for that tender texture.
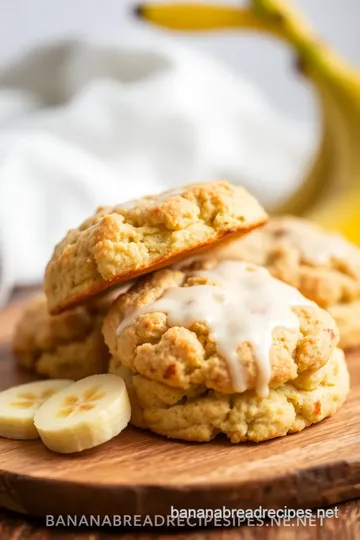
For that wow factor, sprinkle a little coarse sugar on top before popping those babies in the oven. It makes them look fancy, and who doesn’t love a little crunch?
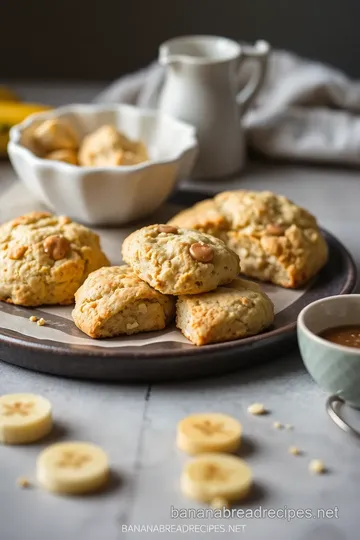
Perfect Presentation: Serving Up Scones Like a Pro
Now let’s talk presentation. you could just throw those homemade banana scones on a plate and call it good, right? but let’s turn it up a notch.
Try to plate them on a simple, colorful dish to let those golden-brown scones shine.
You can’t forget garnishing ! fresh berries or a sprig of mint can bring your dish to life. and don't shy away from colorful spreads! a dollop of clotted cream adds richness, while a scoop of homemade jam brings a pop of color.
It’s amazing how these little things can enhance your scone experience!
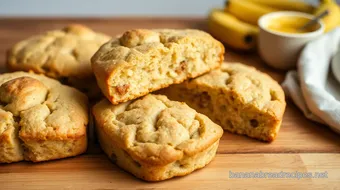
Storage & Make-Ahead Options
Life can get busy, so here’s the scoop on storage. these scones are best fresh, but you can store them in an airtight container at room temperature for up to three days .
If you want to stockpile them, think about freezing before baking! just shape the scones, pop them on a baking sheet to freeze, and then transfer them to a zip-top bag.
Bake straight from the freezer, just adding a couple of extra minutes. this has saved me on busy mornings when i crave quick breakfast ideas .
Creative Variations: Time to Get Funky!
Let’s get creative! this recipe is a canvas. add chocolate chips for that sweet surprise or toss in some chopped walnuts for crunch.
What about going tropical and adding a bit of coconut ? yes, please!
If you have dietary needs to consider, like gluten-free or dairy-free, swap that all-purpose flour with a gluten-free blend and almond milk in place of buttermilk.
Sweet tooth? reduce the sugar or use a sugar substitute for a low-sugar scone.
Complete Nutrition Guide
Did you know that bananas are not just delicious but also packed with potassium , which is great for your heart? each soft banana scone packs about 180 calories .
So, you’re not just indulging; you’re nourishing your body, too.
With about 3 grams of protein per scone, you’re on the right track to a balanced diet. Portion control is essential, so try to enjoy just one or two scones at a time—though I never judge a second helping!
Expert FAQ Solutions
Got questions? no problem! one common issue is scone texture. if yours turn out too dry, it’s probably from overmixing.
Remember to fold gently! another question i get a lot is about variations. can you add spices? absolutely! feel free to throw in some cinnamon or even some nutmeg for extra warmth.
Wrapping It Up
So, are you ready to give these banana scones a whirl? they’re not just delicious baked treats ; they’re perfect for family-friendly recipes and can be a fun cooking venture for everyone.
Grab a few ripe bananas, gather your ingredients, and let’s bake some magic together! trust me, once you master how to bake scones, you’ll be tempted to experiment every weekend.
Happy baking, friends!
My Favorite Quick Banana Scones Card
⚖️ Ingredients:
- 2 cups (250g) all-purpose flour
- 1/4 cup (50g) granulated sugar
- 1 tablespoon baking powder
- 1/2 teaspoon baking soda
- 1/4 teaspoon salt
- 1/2 teaspoon ground cinnamon (optional)
- 1/3 cup (75g) unsalted butter, cold and cubed
- 1 cup (240ml) mashed ripe bananas (about 2 medium bananas)
- 1/4 cup (60ml) buttermilk (or regular milk with a splash of vinegar)
- 1 large egg
- 1 teaspoon vanilla extract
- 1 tablespoon coarse sugar for sprinkling (optional)
🥄 Instructions:
- Step 1: Preheat the oven to 400°F (200°C) and line a baking sheet with parchment paper.
- Step 2: Combine dry ingredients in a large bowl: flour, sugar, baking powder, baking soda, salt, and cinnamon.
- Step 3: Cut in the cold butter using a pastry cutter or fork until the mixture resembles coarse crumbs.
- Step 4: In a separate bowl, whisk together the mashed bananas, buttermilk, egg, and vanilla until smooth.
- Step 5: Pour wet ingredients into the dry ingredients and stir until just combined (do not overmix).
- Step 6: Turn the dough onto a floured surface; gently knead 3-4 times until it holds together.
- Step 7: Pat the dough into a circle about 1-inch thick and cut into 8 wedges.
- Step 8: Transfer scones to the prepared baking sheet, spacing them apart.
- Step 9: Optional: Lightly sprinkle the tops with coarse sugar.
- Step 10: Bake for 15-20 minutes, or until golden brown and a toothpick inserted in the center comes out clean.
- Step 11: Cool on a wire rack for a few minutes before serving.
Previous Recipe: How to Make Churned Banana Pudding Delight: A Family-Favorite Treat
Next Recipe: How to Bake Sweet Potato Bread: Moist & Delicious for Cozy Mornings